

p5.js is written in JavaScript but originally it is Processing (https://processing.org/). Processing is a visual coding tool for visual arts. The interesting is that processing is not only for developers but also artists, designers, researchers and those who want to enjoy making arts. p5.js is used in JavaScript so we can use it with DOM.
The following is the p5.js official site.
https://p5js.org/
GET STARTED:
Make your first sketch in the p5.js Editor.✔
The easiest way to start is using the p5.js editor, you can open the web editor and start working.
In the p5.js web editor you should find the following code:
function setup() {
  createCanvas(400, 400);
}

function draw() {
  background(220);
}
setup(): It is the statements in the setup() function. It executes once when the program begins. createCanvas must be the first statement.
draw(): The statements in the draw() are executed until the program is stopped. Each statement is executed in sequence and after the last line is read, the first line is executed again.
If you click on "<" you will see all the sketch files :
- Index.html is used to add on scripts or design UI.
- Sketch.js is used to write your programming logic.
- Style.css is used to add styles to your UI
index.html contains all the libraries that are used to create your sketch:
<!DOCTYPE html>
<html lang="en">
  <head>
    <script src="https://cdnjs.cloudflare.com/ajax/libs/p5.js/1.1.9/p5.js"></script>
    <link rel="stylesheet" type="text/css" href="style.css">
    <meta charset="utf-8" />

  </head>
  <body>
    <script src="sketch.js"></script>
  </body>
</html>
style.css is the Cascading Style Sheet for your project:
html, body {
  margin: 0;
  padding: 0;
}
canvas {
  display: block;

}
Now go ahead and make few changes in the given code. Follow the below given instructions and see the change.
After background(220); include this line of code: ellipse(50,50,80,80);.
Now your code should be like this:
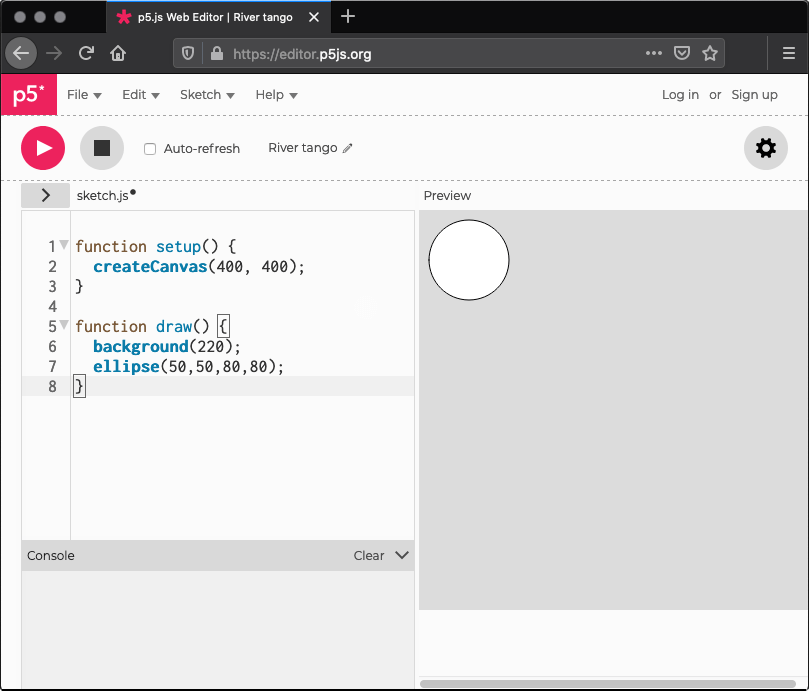
Code snippet with ellipse💫
function setup() {
  createCanvas(400, 400);
}

function draw() {
  background(220);
  ellipse(50,50,80,80);
}
The line you just added draws an ellipse, with its center 50 pixels over from the left and 50 pixels down from the top, with a width and height of 80 pixels.
ellipse(x location of the ellipse, y location of the ellipse, the width of the ellipse, the height of the ellipse) .function draws the ellipse.
On the editor press play to display your code in action!
If you've typed everything correctly, this will appear in the display window:
If nothing appears, the editor may be having trouble understanding what you’ve typed. If this happens, make sure that you've copied the example code exactly: the numbers should be contained within parentheses and have commas between each of them, the line should end with a semicolon, and ellipse has to be spelled correctly.
One of the most difficult things about getting started with programming is that you have to be very specific about the syntax. The browser isn't always smart enough to know what you mean, and can be quite fussy about the placement of punctuation. You'll get used to it with a little practice. In the bottom left of the editor you will find the console section. Here, you can find messages from the editor with details about any errors it encounters.
Code snippet with interaction!😃
Next, we'll skip ahead to a sketch that's a little more exciting. Modify the last example to try this:
function setup() {
  createCanvas(400, 400);
}

function draw() {
  if (mouseIsPressed) {
    fill(0);
  } else {
    fill(255);
  }
  ellipse(mouseX, mouseY, 80, 80);
}
This program creates a canvas that is 400 pixels wide and 400 pixels high, and then starts drawing white circles at the position of the mouse. When a mouse button is pressed, the circle colour changes to black. Run the code, move the mouse, and click to experience it.✨
Let’s make your ellipse move!🏃♂️🏃♀️
draw() function loops forever. Thus, the only thing you have to do is to make y-location sets 0 and then increase it. Then, you get an animation that your ellipse moves from the top to the bottom of your canvas.
var y =0;

function setup(){
    noStroke();
    createCanvas(500,450);
}

function draw(){
    background('green');
    ellipse(width/2,y,50,50);
    y++;
}
So, now your basics are clear. You know what p5.js is, Go on and create exciting projects using this library and do share it with us! 🎉